With cloud data growing at an unprecedented rate, managing storage costs has become a major challenge for businesses. Some data is used frequently, while other data may sit idle for long periods. But, the cost of storing that idle data remains the same. So what can business do to reverse this? Well, to make the most of your cloud investment, you must consider Azure tiering.
Azure tiering allows businesses to categorize data based on how often it’s accessed, optimizing storage costs. By using different storage tiers, companies can better manage their data, reduce costs, and improve performance. In this article, we’ll explore Azure’s storage tiers, key features, and benefits.
Understanding Azure Tiering
Azure Tiering actively manages data storage by placing data in different tiers based on how often you access it. It cuts costs by storing frequently used data in high-performance storage and shifting less-used data to cheaper tiers.
This process can be automated or done manually to ensure data is stored in the most cost-effective way. Azure Storage provides three main tiers to manage data according to access needs while optimizing expenses.
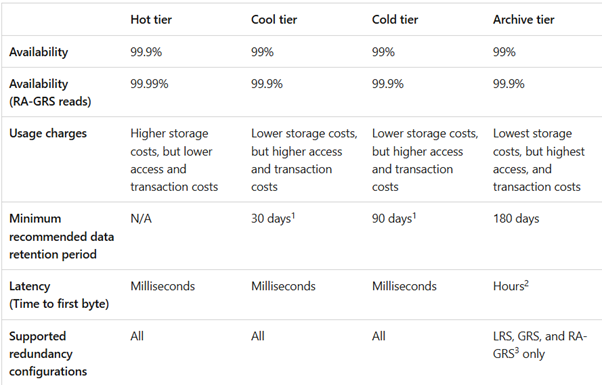
1. Hot tier – An online storage tier designed for data that’s accessed or modified frequently. It has the highest storage cost but the lowest access cost. Some examples of when to use this tier include-
- Data that is actively used or requires frequent reads and writes.
- Data staged for processing before being moved to the cool tier.
2. Cool tier – A cost-effective option for data that is not accessed often but must remain available. It has lower storage costs than the hot tier but higher access costs. Data in this tier should be stored for at least 30 days.
3. Cold tier – This tier is suitable for data that is rarely accessed but still requires quick retrieval. It has lower storage costs than the cool tier but higher access costs. Data in this tier should be stored for at least 90 days. The cool and cold tiers are suitable for-
- Short-term backups and disaster recovery.
- Older data sets that are not frequently used but must remain accessible.
- Large data sets that need cost-effective storage while more data is gathered for processing.
4. Archive tier – An offline storage tier for data that is rarely accessed and doesn’t require immediate retrieval. It has the lowest storage cost but takes hours to access. Data should be stored for at least 180 days. This tier is best for-
- Long-term and secondary backups.
- Raw data that must be preserved even after processing.
- Compliance records and archival data that need long-term storage but are rarely accessed.
Benefits of Azure Tiering
Below are a few key benefits of Azure tiering.
1. Save Costs by Storing Data in the Right Place
The major benefit of Azure tiering is that it helps you optimize costs by matching the storage type to how frequently you use the data. For example, data you access frequently can be stored in the hot tier, while data you don’t need as often can be placed in the cold tier. This way, you’re not paying high storage costs for data you rarely use; instead, you only pay premium rates for the data you access regularly.
2. Automate Data Storage and Management
Manually adjusting storage tiers can be time-consuming, but Azure Storage simplifies this with lifecycle management policies. These policies let you set rules that automatically move data to a lower-cost tier or delete it after a certain period. Let’s say you could configure a rule to-
- Move data from Hot to Cool if not accessed for 30 days.
- Move data from Cool to Archive after 90 days.
- Delete data that is older than 365 days.
It reduces management overhead and helps enforce data retention rules with minimal effort.
3. Scale Easily and Manage Large Data Volumes
With tiering, Azure Storage is highly scalable and efficient for huge amounts of data. You can store massive volumes of information (even petabytes of data) and still keep costs in check by offloading infrequently used content to lower-cost tiers.
Because Azure handles the infrastructure, you can grow your storage without worrying about running out of space or setting up new servers. Simply add data and assign it to the right tier. Tiering also lets you replace traditional archival methods (like keeping backups on tapes) with cloud storage, so you never have to migrate data across hardware or deal with physical storage limits.
4. Maintaining Performance for Active Data
Although tiering helps optimize costs, it also keeps important data easily accessible. But how does it do that? The data stored in the Hot tier has low latency, so users can retrieve and work with it almost instantly. In contrast, data in the Archive tier is meant for long-term storage and may take hours to access.
With tiering, frequently used data stays in a high-performance tier for quick access, while rarely used data moves to a slower, cost-effective tier. In other words, you match performance to usage, making sure that critical data remains easy to access while archive data sits in a lower-cost tier for infrequent use.
Choosing the Right Tier
By now, you have a clear understanding of the different storage tiers Azure offers. Each tier serves a unique purpose, so it’s important to determine which one best suits your workload. But how do you decide? Here are three key factors to consider when choosing the right tier-
FAQs
1. How frequently do you need data access?
Do you need to access the data almost daily? Does it require frequent modifications? If yes, the hot tier is the best choice because it has a low access cost. But if the data is rarely needed, the cool tier makes more sense since it offers lower storage costs but higher read costs. Before deciding, assess how often you need to access specific data.
2. How quickly do you need to access it?
Next, consider the retrieval speed. If the data is critical and needs to be retrieved instantly, the hot tier is ideal because it offers lower retrieval latency, higher durability, and better throughput. If retrieval speed isn’t a priority, a cooler tier can help cut costs.
3. What is your budget?
Beyond storage and access costs, consider other expenses associated with each tier. For instance, every operation (such as reading or writing data) incurs a transaction charge, which increases as the tier gets cooler. So, be mindful of these costs when selecting the right tier.
One way to manage costs effectively is by using Azure Blob Storage lifecycle management. This tool allows you to set rules that automatically move data between tiers based on access patterns. For example, you can configure it to shift infrequently accessed files from the hot tier to the cool or archive tier, lowering costs without manual effort. It also lets you set policies to delete data when it’s no longer needed, further optimizing storage expenses.
Implementing Azure Tiering
When setting up a new Azure storage account through the Azure portal, you can choose a default access tier for Blob storage. This tier determines how often data is accessed and its associated costs. To configure it-
- Step 1 – Open the Storage Accounts page in the Azure portal and click Create to begin.
- Step 2 – Fill out the Basics tab.
- Step 3 – Navigate to the Advanced tab, locate the Blob storage section, and select an access tier, i.e, Hot, Cool, or Cold. The default setting is Hot.
- Step 4 – Click Review + Create, check your settings, and complete the setup.
Below are the steps to add a lifecycle management policy in Azure to automatically move or delete blobs based on specified conditions.
- Step 1 – Go to your storage account in the Azure portal.
- Step 2 – Under Data Management, select Lifecycle Management.
- Step 3 – Click on the List View tab.
- Step 4 – Select Add a rule and enter a name for the rule.
- Step 5 – Set parameters like Rule Scope, Blob Type, and Blob Subtype (e.g., filter blobs by name or type).
- Step 6 – Under Base Blobs, define the conditions for the rule, such as moving blobs to the Cool tier if they haven’t been modified for 30 days.
- Step 7 – If you want to use Last accessed criteria, access time tracking must be enabled, and the blob type should be Block blobs.
- Step 8 – If you want to filter specific blobs, go to the Filter set tab and define filters. For example, you can filter blobs whose names begin with “log” in a container called “sample-container.”
- Step 9 – Click Add to apply the policy.

Cost Optimization with Azure Tiering
Azure Tiering helps you optimize your storage costs by allowing you to store data in different tiers based on how often it’s accessed. The Hot tier is for data that’s frequently accessed but comes with higher costs. The Cool tier offers lower storage costs for data that isn’t accessed as often, while the Archive tier is the most affordable option for backup or rarely accessed data.
Turbo360 an Azure cost management platform makes managing these tiers much easier by automating the process. Here’s how it can help-
- It automatically moves infrequently accessed data to the Cool or Archive tiers, so you don’t have to manually monitor or shift blobs around.
- Turbo360 can delete outdated blobs based on when they were created or last modified, clearing out unnecessary data and reducing storage costs.
- It ensures data that’s no longer frequently accessed gets moved from the Hot tier to a lower-cost tier, optimizing your storage usage.
- You can manage storage queues, resubmit or delete messages, and even query storage tables for more control.
- With Turbo360 Cost Analyzer you can easily track Azure storage spending across multiple subscriptions. You can even set up alerts for when storage costs exceed your set limits, so you’re always in the loop.
By using Turbo360, businesses can make sure they’re only paying for the storage they actually need, without constantly having to keep track of it manually. It also helps you track your Azure spending across multiple subscriptions, set up cost alerts, and manage trends, all in one place
Conclusion
Azure Tiering helps optimize cloud storage costs by classifying data into four tiers. These include Hot, Cool, Cold, and Archive, based on access frequency.
Each tier offers different storage and retrieval costs, allowing businesses to store data more efficiently. The Hot tier is best for frequently accessed data, while the Archive tier is ideal for long-term or rarely accessed data.
By automatically moving data between these tiers, Azure ensures that businesses only pay for the storage they actually need. This process helps companies to manage large data volumes efficiently and avoid unnecessary costs, all while simplifying storage management.