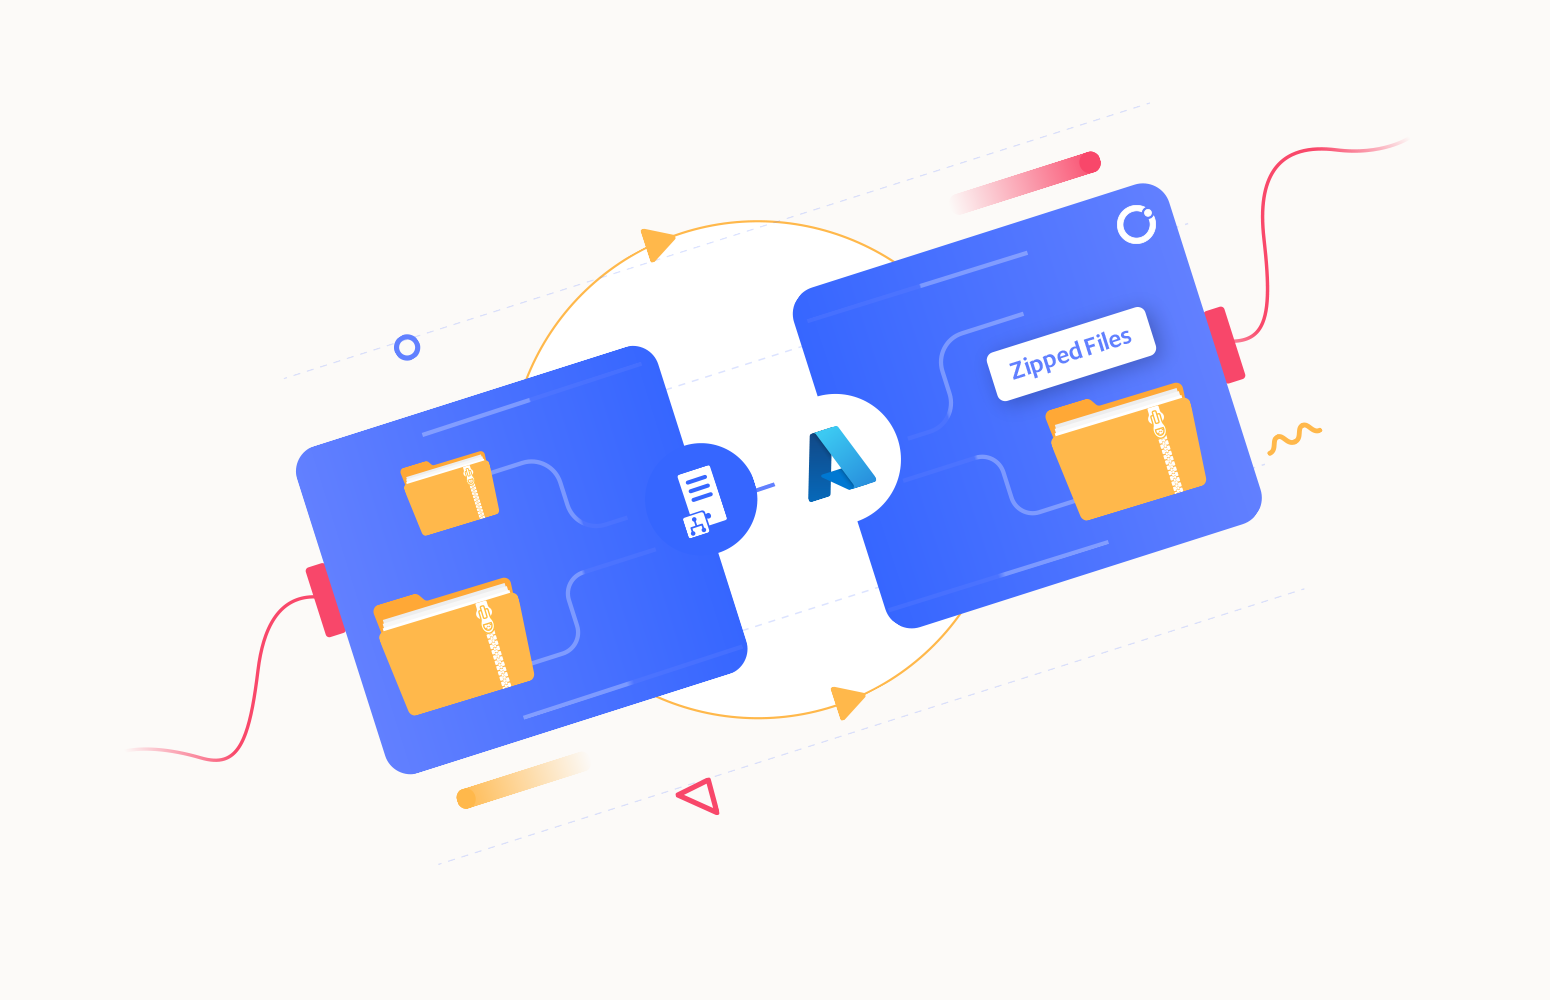
Welcome again to another BizTalk Server to Azure Integration Services blog post. In my previous blog post, I discussed how you can migrate one-way BizTalk Server routing solutions. Today, we will address another classic requirement in legacy BizTalk Server solutions: How to send zipped messages (files)?
It is not that hard to find BizTalk Server solutions/processes that need to send zipped messages or files to partners through:
- The use of FTP/SFT or File adapter in order to reduce the size of the files and, by doing so, to transfer them quickly;
- Zipped (compressed) files take up less storage space and can be transferred to other computers more quickly than uncompressed files.
- To combine multiple files into one single compressed file, simplifying the communication between the two systems;
- Instead of opening multiple channels to that end system and controlling multiple failures, we just need to perform a single connectivity.
- Or by sending email attachments zipped in order to minimize reaching the attachment size limit of certain email providers;
In this POC, we will only be addressing single files sent compressed.
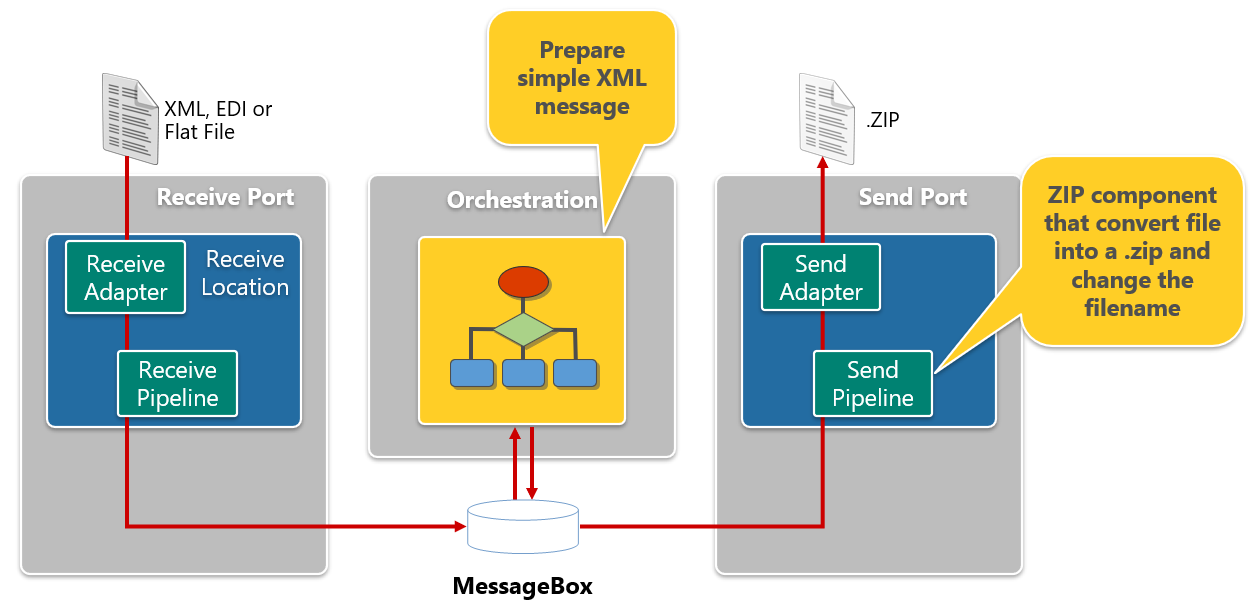
BizTalk Server solution: For sending a simple zip message by File or (S)FTP
Of course, as always, there are multiple ways to accomplish this solution. But one of the most simple and elegant solutions to achieve this is by:
- Creating a custom pipeline component to zip (or compress) the message we want to deliver. This component will also need to change the filename property in order for the adapter (FTP, FILE, …) to create it properly. A good sample is my Zip Pipeline Component available in my GitHub. You can find the source code here: Zip Pipeline Component.
- The Zip pipeline component is a pipeline component for BizTalk Server that can be used in a send pipeline (encode stage) and is intended to compress (zip/gzip) outgoing messages.
- The capabilities are similar to those available in compression software such as WinZip or 7-zip:
- This component requires the configuration of two properties:
- FileExtension, where you can specify if you want, for example, a .zip or .gz file
- Enabled, which is a true or false value to activate the compression.
- This component requires the configuration of two properties:
- Create a custom send pipeline with that zip pipeline component. The solution will be agnostic to the adapter used.
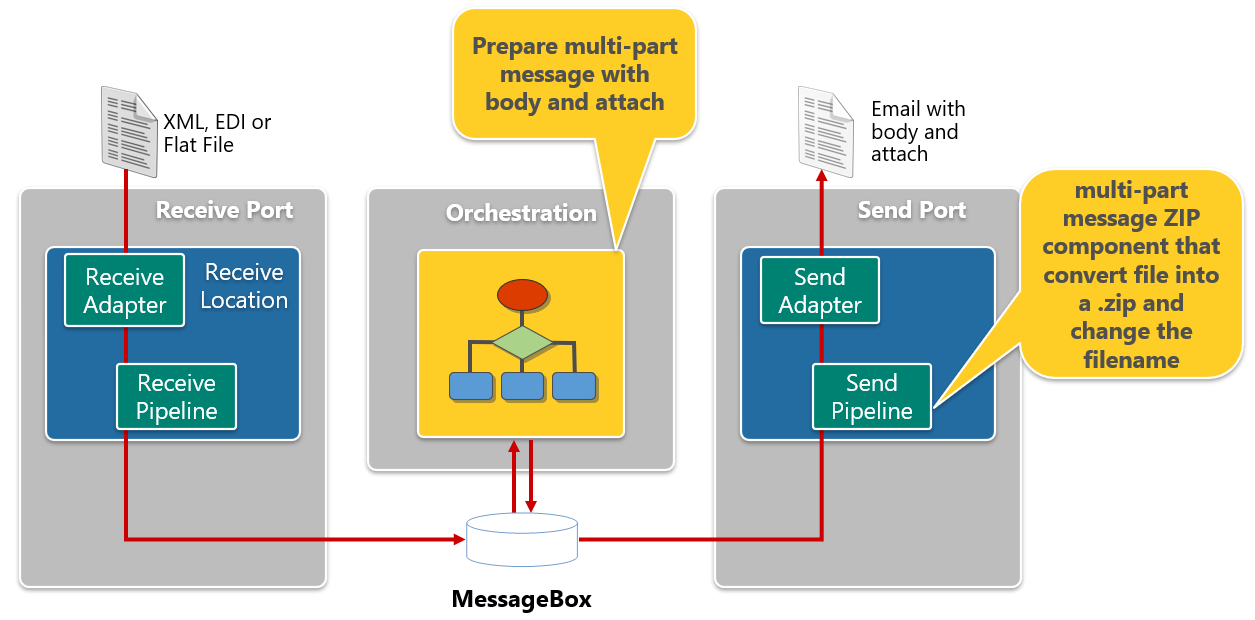
BizTalk Server solution: For sending a simple zip message by email
Another similar solution is to send the message as an email attachment. In this scenario, normally, we will define a body email (text/HTML) and attach the compressed message in an attachment. In this case, we need:
- Creating a custom pipeline component to zip (or compress) the multi-part message we want to deliver. The multi-part message in this concept means that this message is composed of two or more messages: one is the body, and the other or others are the attachments. This component will also need to change the filename of each attachment. A good example is my Multi-Part Zip Pipeline Component, available on my GitHub. The source code is here: Multi-Part Message Attachments Zipper Pipeline Component.
- The BizTalk Multi-Part Message Attachments Zipper is a pipeline component for the BizTalk Server that can be used in a send pipeline and is intended to replace all attachments of a multi-part message for its zipped equivalent.
- The capabilities are similar to those available in compression software such as WinZip or 7-zip:
- Attachments Compression – Extracts, in a send pipeline, all message parts included in a multi-part message that are not included in the message body (Message Body Part = False), compresses it and attaches the compressed attachment back to the message.
- This component requires one configuration: the FileExtension, where you can specify if you want, for example, a .zip or .gz file.
- Create a custom send pipeline with that multi-part zip pipeline component. The solution will be agnostic to the adapter used, but it was designed to work with the SMTP adapter.
In both solutions, basically, what we need is a custom pipeline component and a custom send pipeline. The send pipeline will be in charge of converting (normalizing) that message on what is expected. Our Business process will focus on implementing the integration logic regardless of channel or message format. This is one of the advantages of BizTalk Server compared to Azure Integration Services (AIS). BizTalk Server is a clear boundary between what code/logic is and what configurations are, and in the runtime, we can always change the communication channel, for example, passing from a FILE to an FTP without modifying our solution.
The challenge
You may be thinking, once again, that these types of solutions are old-school, and no one sends messages (or integrates) by email! Well, if I were you, I would not be too sure about that! Some clients use a lot of FTP and email connectivities to exchange messages with partners.
But the point here is not to discuss whether these types of integration are old-school or not or if you should improve them. The goal here is that you have a request to migrate these types of solutions from BizTalk Server into Azure Integration Services, maintaining the exact requirements. This is a straightforward integration that, at first glance, is quite simple to migrate; however, there is one big challenge: by default, there isn’t any component (expression or out-of-the-box connector) to zip a message (or file).
To migrate this solution using Azure Integration Services, we need to use one of these two stack options:
- Logic App (Consumption or Standard) + Azure Function to zip the message
- Logic App (Consumption or Standard) + thirty-party Encodian connector
For this proof-of-concept, we decided to use the two options.
Building the Logic App solution
In this Proof-of-Concept (POC), we aim to investigate the zipping of files, whether they are in text, JSON, or XML format. We will explore two different methods to accomplish this.
The first method involves zipping files using an Azure Function. The second method uses a connector provided by Encodian. To begin with the first method, we must first create an Azure Function in Visual Studio.
So, to do this, first:
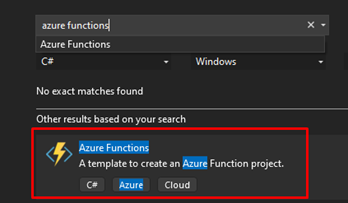
- Open Visual Studio and Create A New Project.
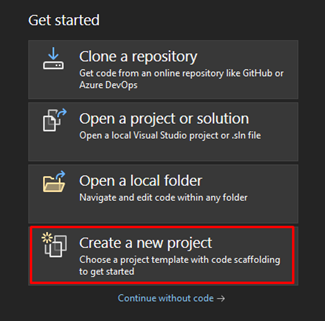
- In the search bar, search for Azure Functions and select it.
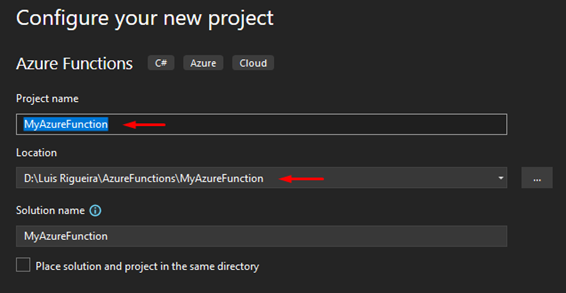
- Next, define the location and the name of your Azure Function.
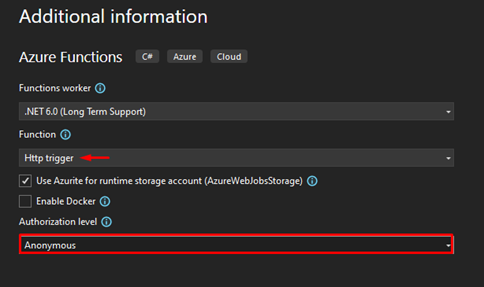
- Finally, choose the HTTP Trigger and the Authorization level. For this tutorial, we are going with Anonymous.
To complete the Azure function capable of zipping a message (or file), check the following code available in my blog post: Azure Function: Zip File.
This Azure Function, called ZipData, is designed to handle incoming HTTP requests. It performs the following tasks:
- It expects a POST request, and the request body should contain data in a specified format (such as JSON, XML, or plain text).
- It determines the incoming data’s content type based on the HTTP request’s Content-Type header.
- If the request body is empty or lacks valid input data, it responds with a Bad Request status and a message prompting the client to provide proper input data.
- If the content type is supported (e.g., JSON, XML, or plain text), it compresses the input data into a ZIP file.
- The ZIP file is returned as a response with the Content-Type set to application/zip, and the default name as output.zip.
In simple terms, this Azure Function takes input data in different formats, compresses it into a ZIP file, and provides the ZIP file for download when the request is made via HTTP POST.
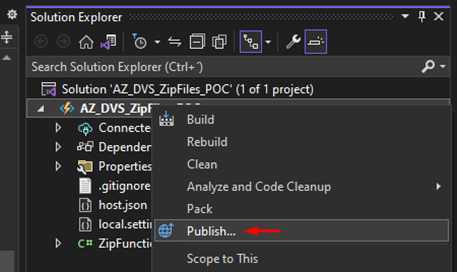
After the Azure Function is created, you need to publish it into your Function App, and to do so:
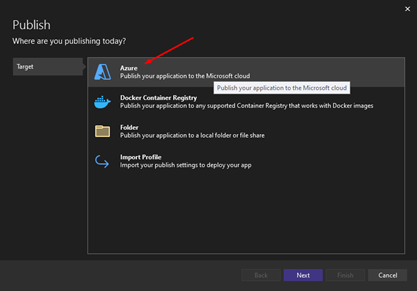
- In the Solution Explorer, right-click on the project and click on Publish.
- Choose where you want to publish your Azure Function. In this case, it is on Azure.
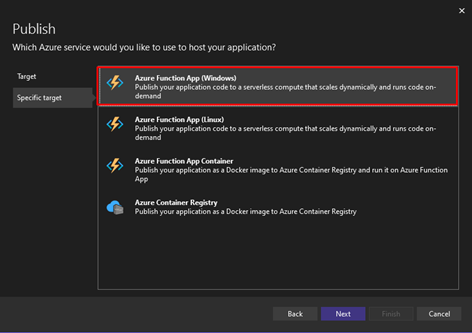
- Next, choose where on Azure you want to host the Azure Function. In this case, we want to host it in the Azure Function App on Windows.
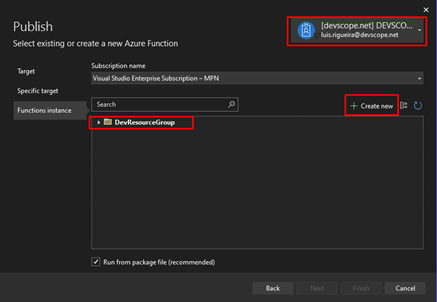
- Next, you will need to use your credentials to identify you as an Azure Portal user and choose a Resource Group that you administer. Click on Create new to create a Function App.
- Here, you will need to populate some fields, and in doing so you will create the Function App itself. Next, click on Create.
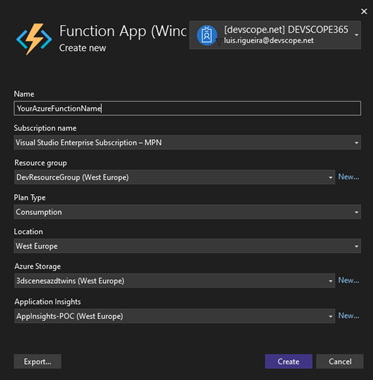
- Finally, click on Publish to publish the Azure Function.

Now, since your Azure Function is published in your function app, you are now able to call it via a Logic App, and that is what we pretend.
So, the next step is to create a Logic App. In this POC, we will be making a Logic App Consumption. To do so:
- Search for Logic Apps in the Azure Portal search bar, click on it, and click on +Add.
- Next, you will need to populate some fields like:
- Subscription
- Resource Group
- Logic App Name
- Region
- As for the plan, choose Consumption, next click on Review and create, and next on create.

- Wait for the deployment to occur, and then click Go to resource.
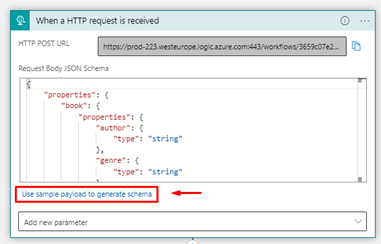
- Inside the Logic App editor, let’s start our Logic App with the Trigger When a Http Request is Received, and the input we are going to send to this Logic App is this JSON:
{
        "book": {
            "title": "Misty Mountains",
            "author": "John Doe",
            "publicationYear": "2023",
            "isbn": "978-1234567890",
            "genre": "Fiction"
        }
}
- So, let’s generate an input schema by clicking on Use sample payload to generate schema, and past the above JSON payload.
- Next, let’s add a new action, this time from the Azure Functions.
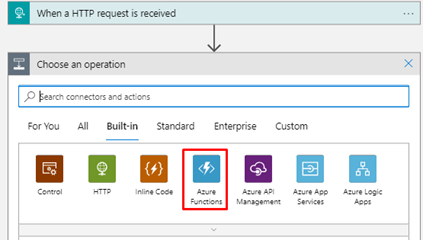
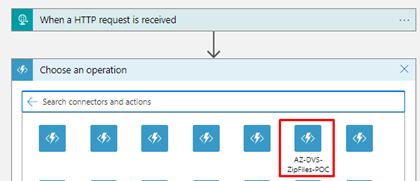
- Click on it and search the Azure Function we published before:
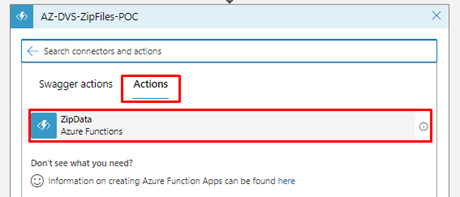
- Click on it and choose the action assigned to it:
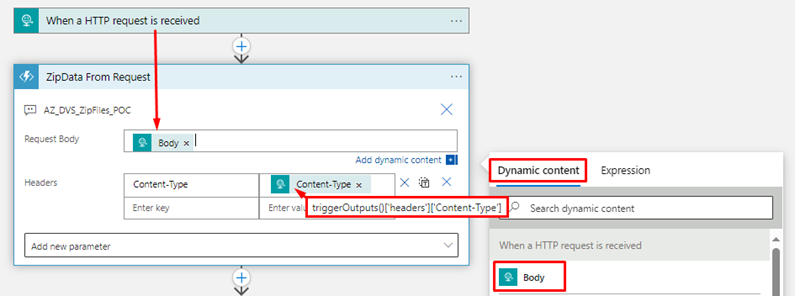
- Now, on the Request Body, dynamically choose the Body from the trigger When a HTTP request is received, on the parameters, choose the Headers, and on the Enter key, populate it with Content-Type, and on the Enter value, write the following expression:
triggerOutputs()['headers']['Content-Type']
-
- This will give the content type that is being received on the Headers when the request arrives.
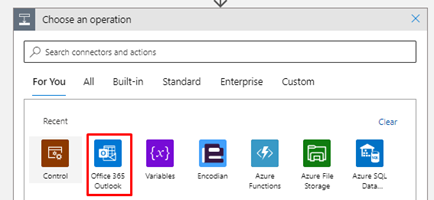
- Now is the time to add another action, this time the Office 365 Outlook:
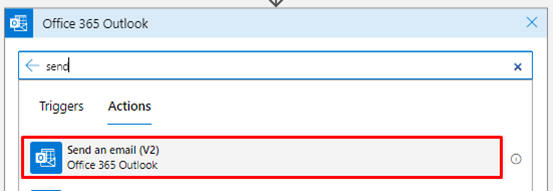
- As for the action, choose the Send Email (V2)
- Next, configure the connector with your credentials to have it ready to configure in the workflow.
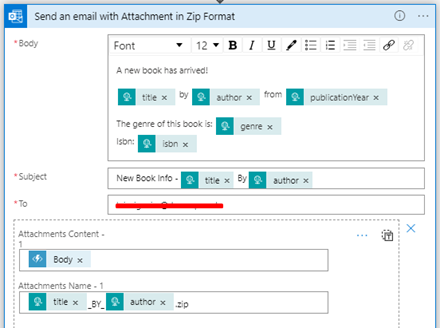
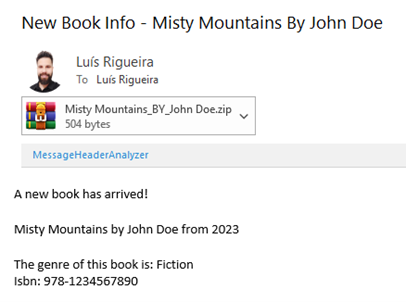
- As soon as you have it ready, you can write a body, a subject, and the email to whom you want to send it. You can also choose to add an Attachment.
- As for the body, since we generated a schema earlier, we wrote and used the dynamic content to create the message.
- On the Attachment on the Content, we dynamically choose the Body of the output from the Azure Function Connector, and as for the name of the file, we dynamically choose the title followed by _BY_, and we choose the author followed by .zip.
- Now, if you have not saved your Logic App yet, you should do it, and you will notice that in the Trigger connector, a URI is generated. Once that URI is generated, copy it to POSTMAN.
- Once you’ve copied the URI into Postman, select the raw format and choose JSON, then paste the previously provided JSON.
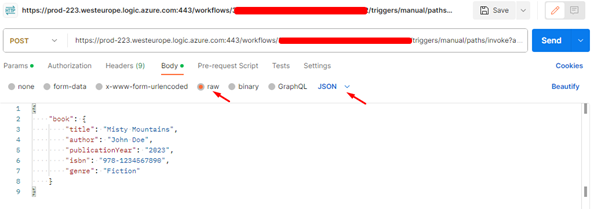
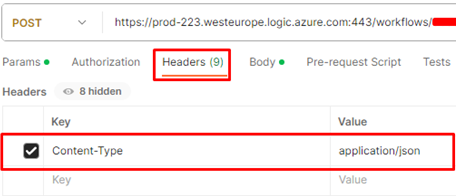
- Next, click on the Headers and on the Key, populate that field with Content-Type, and on the Value, set it as application/json. This way, the request is made with the headers set with the corresponding format.
- Now click on Send to send the request to the Logic App.
- And you should now receive an email like this one:
This was one way to do it.
The second approach is, instead of using an Azure Function, will be using a third-party connector called Encodian. To do that:
- First, go to the website: you will need to Activate Free Trial, to have access to an API Key
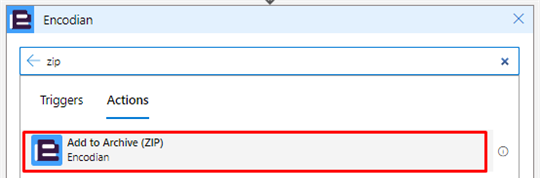
- After that, using the same workflow logic as the previous approach, instead of adding an Azure Function action, we will be selecting the Encodian connector:

- And the Action Add to Archive (ZIP) :
- You will then need to populate the fields with the connection name and the API Key provided in the Encodian Website, and you will then be able to configure the connector.
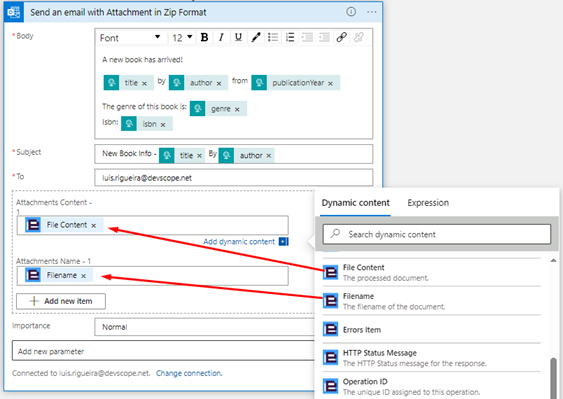
- In this case, we need to select the Body to the Documents File Content dynamically. In the Documents File Name, we dynamically selected the title followed by _ and the author followed by .json.
- As for the Filename, this is important, do not forget to add the .zip extension at the end of the expected Filename. For this POC, we choose to keep it static.

- As for the Outlook connector, when you add an attachment, you just need to dynamically select the File Content and the Filename.
- If you save your Logic App and test it, the result should be the same.
While the end result remains unchanged, in the long term, the API key from Encodian incurs costs and works only as long as the subscription remains active. In contrast, the Azure Function operates without ongoing third-party associated costs, probably making it a more cost-effective and appealing long-term solution.
Big thanks to Luis Rigueira for helping me create and test this solution.
I hope you find these architecture samples useful and stay tuned for more BizTalk Server to Azure Integration Services.