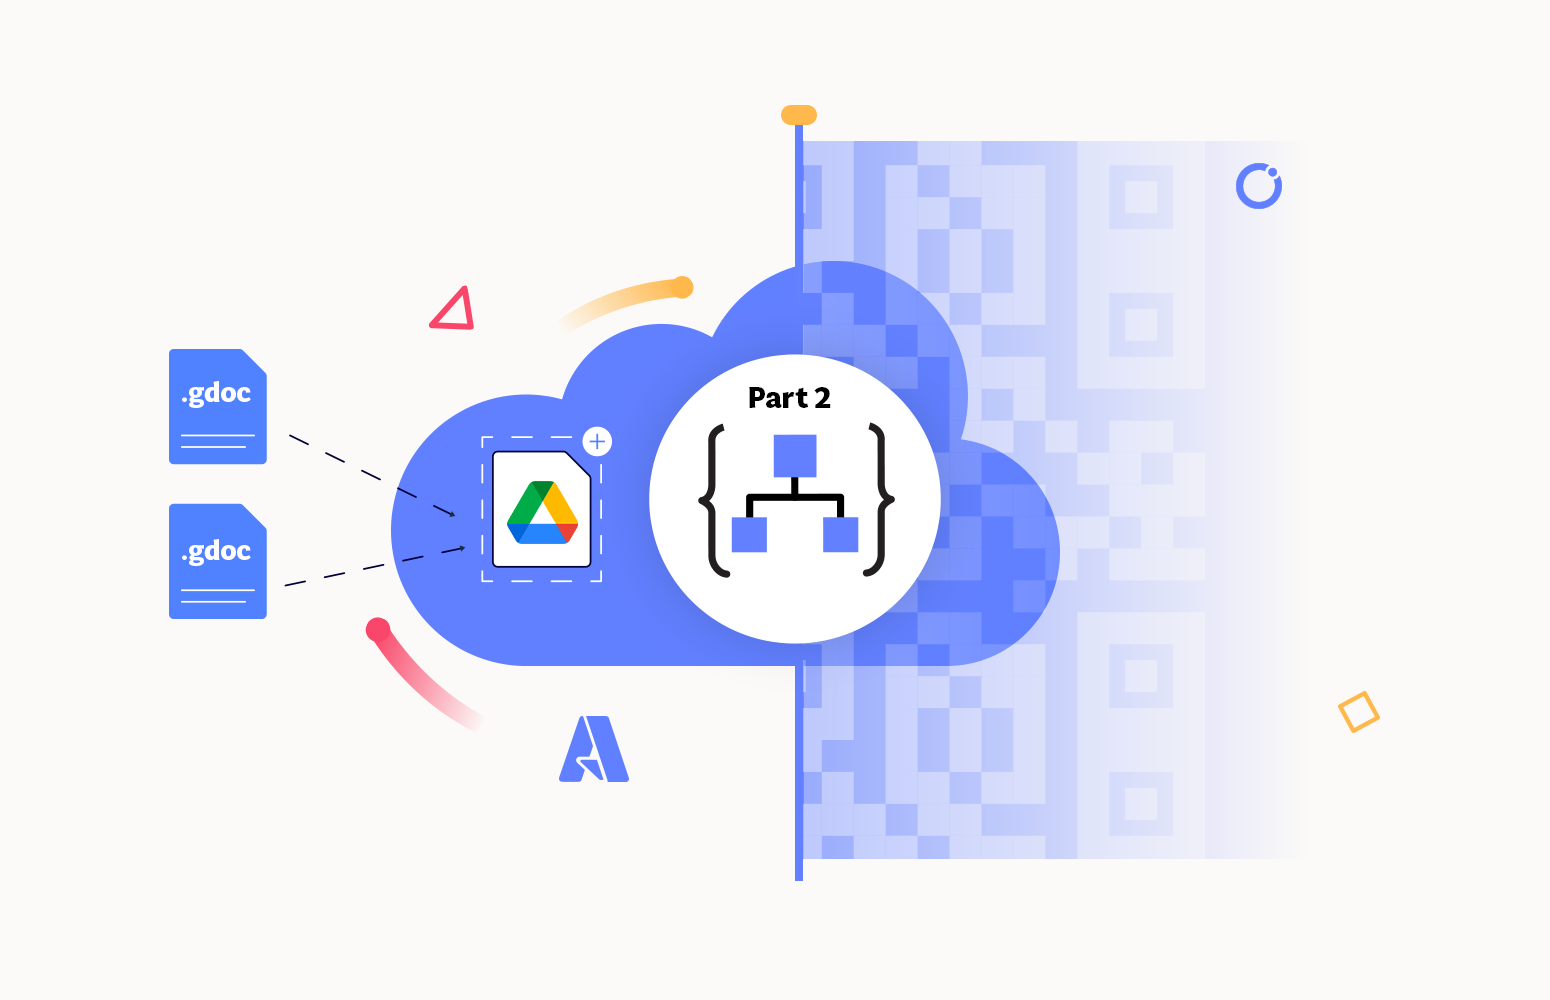
Welcome again to another Decoding Logic App Dilemmas: Solutions for Seamless Integration! This time we selected a different problem but a very common scenario in Enterprise Integration: File transfer. But in this very particular case: How to copy .gdoc files from Google Drive into another place using Azure Logic App?
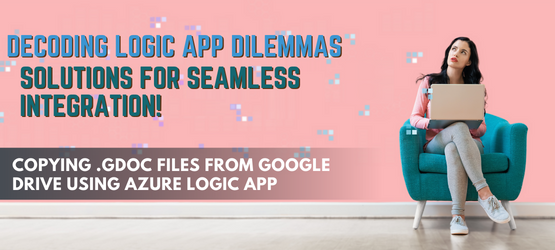
In this situation, what is required is a solution that can convert the Google Documents (.gdoc) into Word Documents (.docx). Of course, this might seem simple at first, but as soon as you start diving into it, it has more to it than it let it show.
Converting GDoc files to word documents using Azure Logic App
In Google Web UI Perspective, we have the option to download the Google Docs (word) files in terms of the formats. From the Logic App perspective, we can easily list files from the folder but converting that .gdoc files into Onedrive word files (.docx extension) using Azure Logic App is not a straightforward task since we don’t have a suitable connector to achieve it.
Solution: Using an Azure Function to convert Google Documents into Word Documents
First, since we will be using Google material, we need to create a Google Service Account, but how can we do that? And why do we need it?
We need it because some credentials are expected when connecting with the Google APIs, and we want those credentials.
And how? First, we need to have, of course, a Google account, next click on this link (if you are not logged in to your Google account, you will need to do it)
Next, click on Select a project, and a window will pop up. Then click on NEW PROJECT
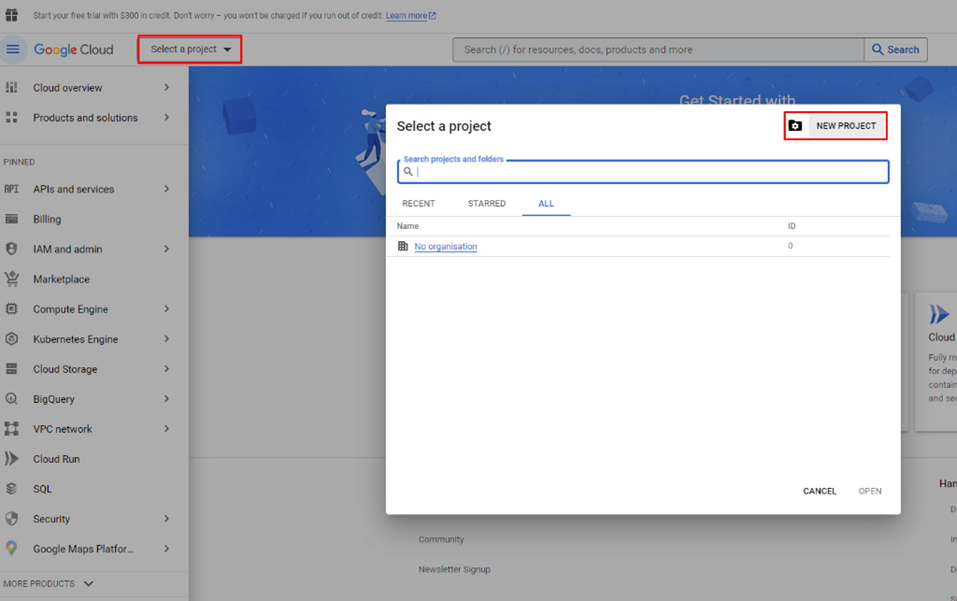
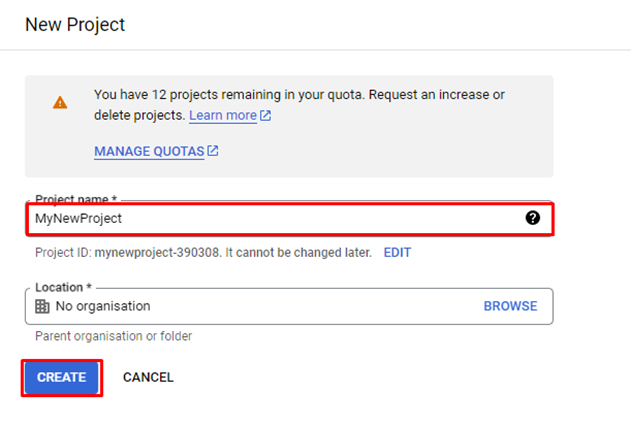
Next, give your project a name, don’t forget to give it a meaningful name because start using proper names from day one is the key to good health, and then click on Create
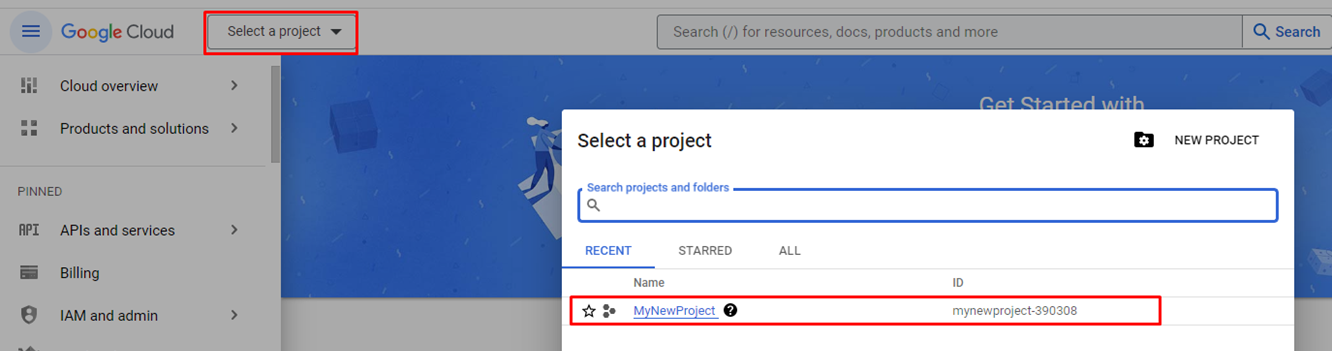
Now if you click on the Select a project again, your project will be there already. But what else do we need more for this to function?
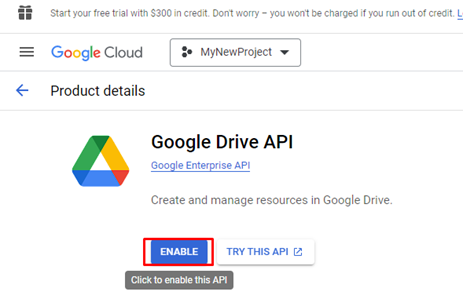
On the side menu, click on APIs and services, and Enabled APIs and services. Next, click on Library and scroll down until you find Google Drive API, and this is what we want because Google Drive is what we are going to work with. So, click on it.
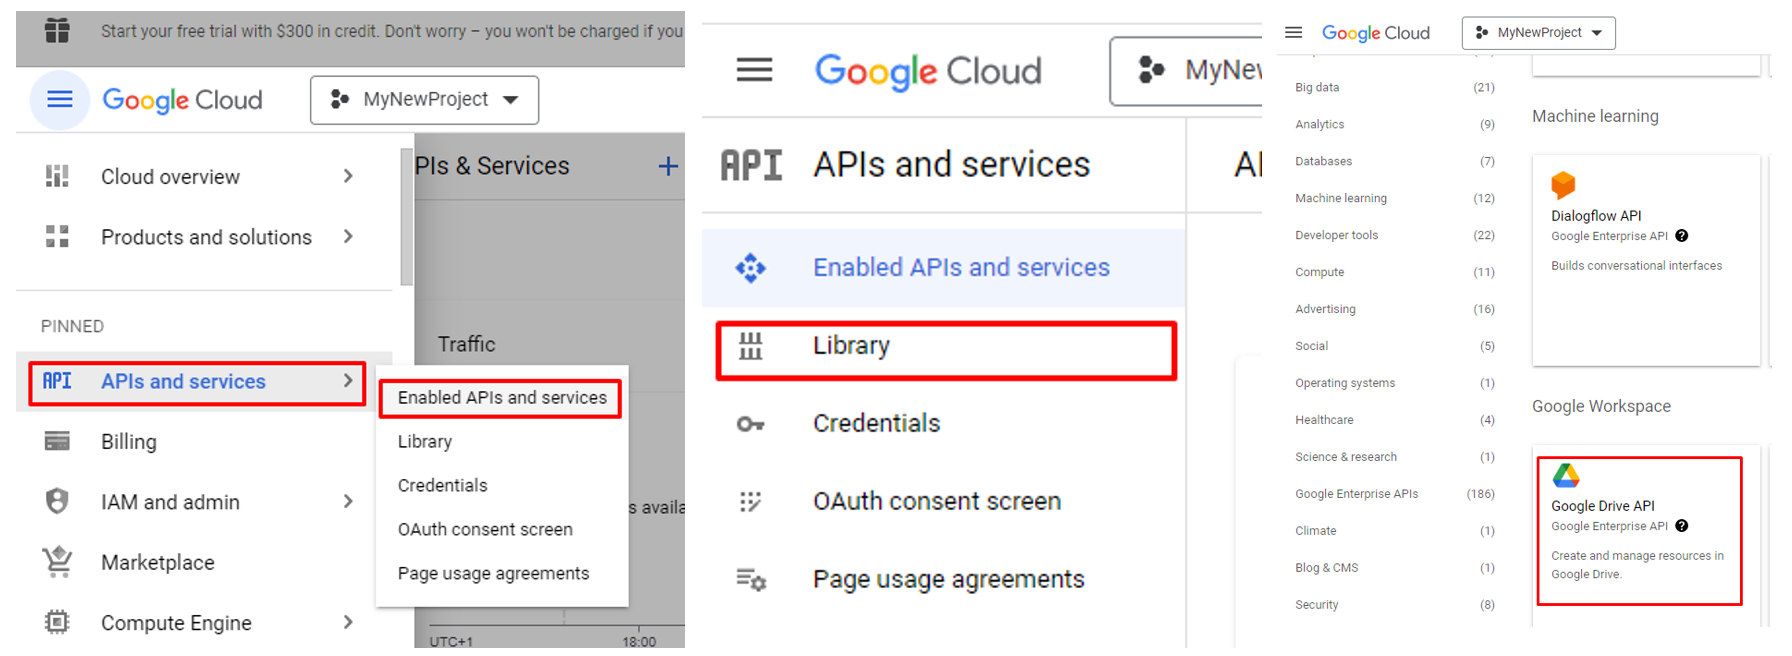
Next, click on Enable, to enable this API.
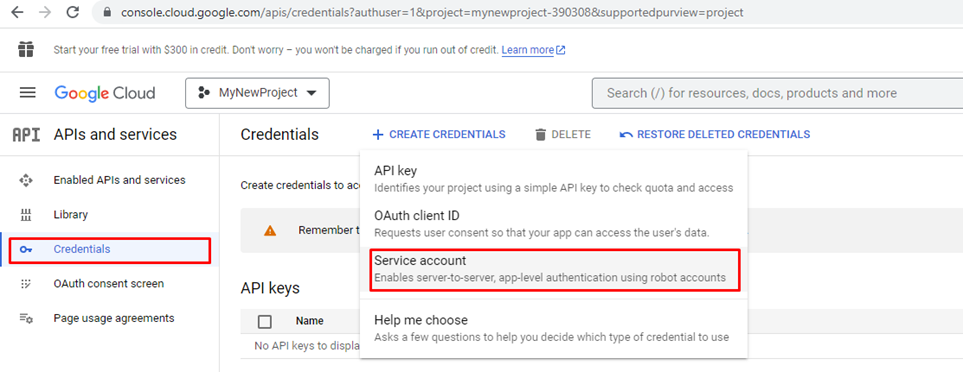
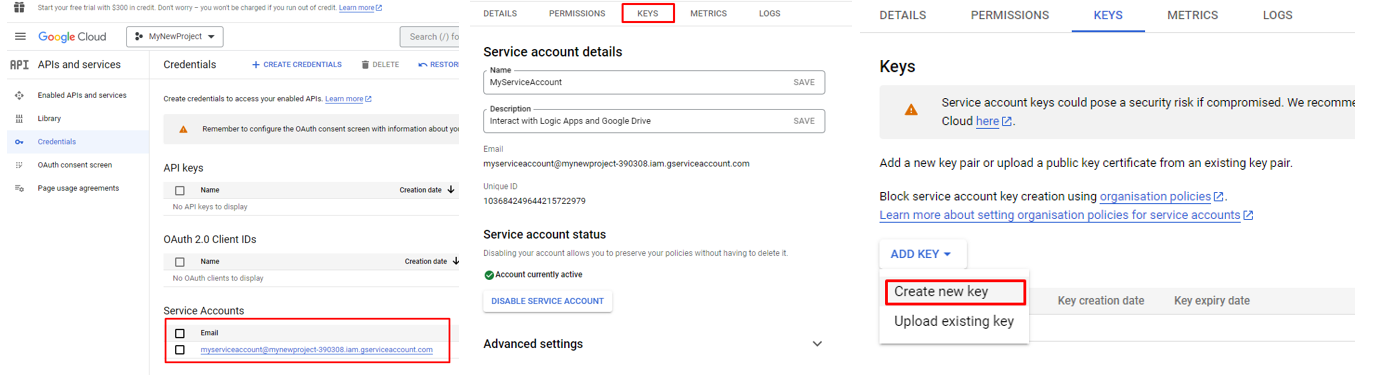
Next, going back to your project, click on Credentials, CREATE CREDENTIALS, and choose Service Account.
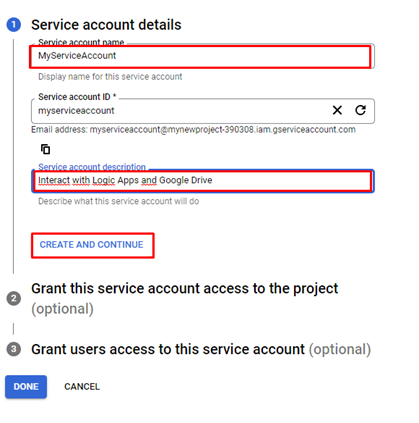
Next, on the Service Account details, give it a meaningful name, and you can also give it a small description. Click on Create and Continue.
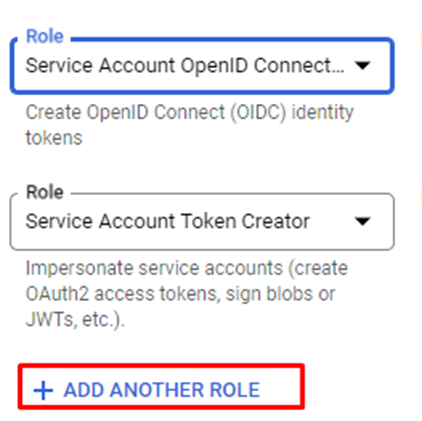
Next, on the Grant this service account access to the project, choose the role by filtering it by token, and add those two roles.

To add the second role, you need to click on + ADD ANOTHER ROLE
On Grant user access to this service account panel, you can use an email that is part of the group of emails of your Gmail account. If you only have one email you can use that as well.
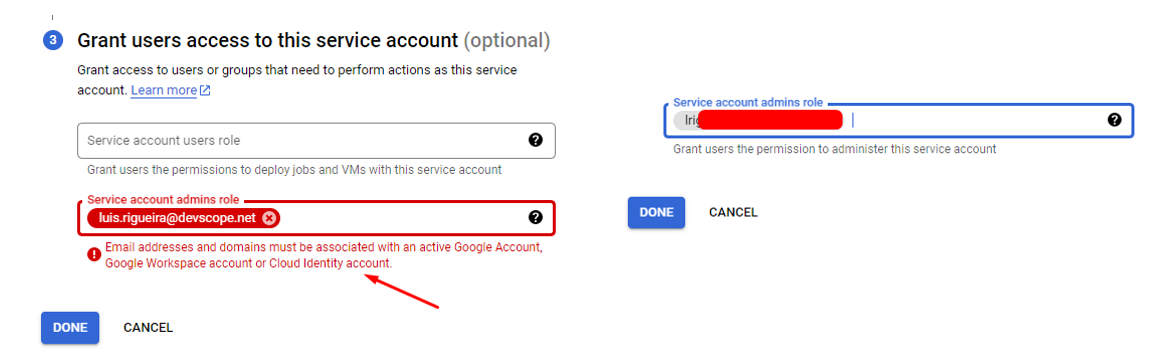
Next, click on Done, and now your service account is created.
Next, go back to your project, click on your Service account, click on Keys, and Create new Key.
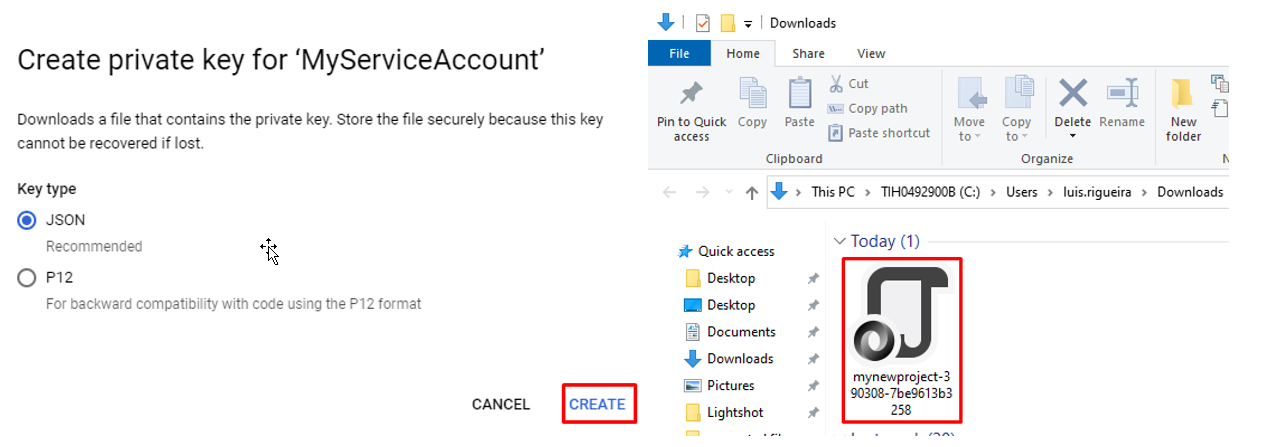
Next, a window will pop up, and you can choose the Key type as JSON and click Create. A JSON, file will be downloaded automatically with the credentials you need for this proof of concept.
So this is the first part of this tutorial. We can call it the Google part. Now we need two more parts, an Azure Function and a Logic App.
As for the Azure Function, we will use one that converts the file inside the Drive into a base64 .docx encoded file. How can we do that?
I’m not going to add here the source code since it is a little extensive but you can find and download it here.
Just for your curiosity, the Azure Function will include the following NuGet packages:
- Google.Apis.Auth (Version 1.58.0 or later): This package provides authentication and authorization functionality for accessing Google APIs.
- Google.Apis.Docs.v1 (Version 1.58.0 or later): This package provides the Google Docs API client library, allowing you to interact with Google Docs.
- Google.Apis.Drive.v3 (Version 1.58.0 or later): This package provides the Google Drive API client library, enabling you to interact with Google Drive.
And basically, what this function will do is:
- The Azure Function is triggered from the Logic App (can be another method) by an HTTP POST request ([HttpTrigger(AuthorizationLevel.Anonymous, “post”, Route = null)]).
- The function expects the fileId to be provided as a query parameter in the request URL and the X-Secret-Google-Credentials header to contain the Google service account credentials in JSON format.
- If either the fileId or X-Secret-Google-Credentials is missing or empty, the function returns a BadRequest response indicating the missing information.
- If the required parameters are provided, the function loads the service account credentials from the provided JSON file (GoogleCredential.FromJson(googleCredentialsJson)).
- The function creates Drive and Docs services using the service account credentials.
- It then makes a request to export the specified Google Docs file (service.Files.Export(googleDocsFileId, “application/vnd.openxmlformats-officedocument.wordprocessingml.document”)) and retrieves the resulting document as a stream.
- The stream is used to create an HttpResponseMessage with the exported document as the content.
- The response headers are set to indicate that the response content should be treated as a downloadable attachment with the file name “converted.docx” and the MIME type “application/vnd.openxmlformats-officedocument.wordprocessingml.document”.
Overall, the Azure Function converts a Google Docs file to a DOCX file format using the Google Docs API and returns the converted file in base64 in the HTTP response.
So now you know what this Azure Function does, you need to replicate it and publish it to your Azure subscription.
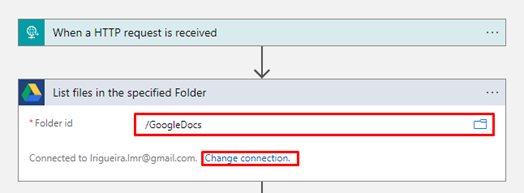
Next, we need to create the Logic App, to do so, create a Logic App, we will be using Logic App Consumption, giving it a meaningful name, a resource group, and a location, and as for the trigger for this proof of concept, we go with:
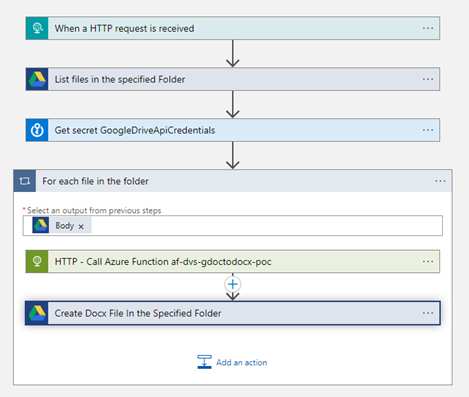
- Request > When a Http request is received.
-
Next, add an Action from Google Drive, in this case a List Files, and configure the connection to your google drive, next choose the location where you have the google docs.
-
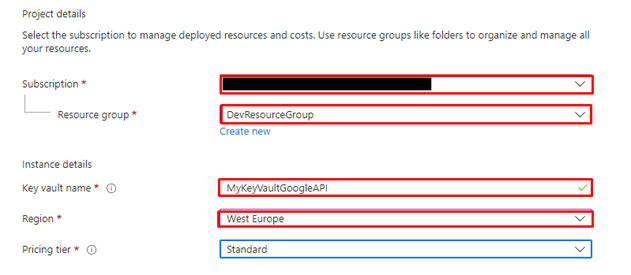
Next, we are going to need a Secret, and to do that in the Azure Portal, search for KeyVault, and click on Create.
-
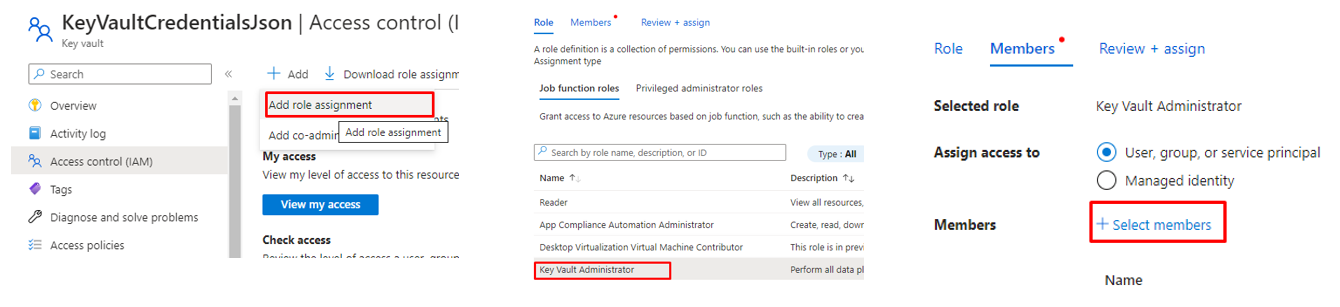
Next, click on Access control, add role assignment, choose Key Vault Administrator, and on select members, choose yourself. Without this, you will not be able to create secrets.
-
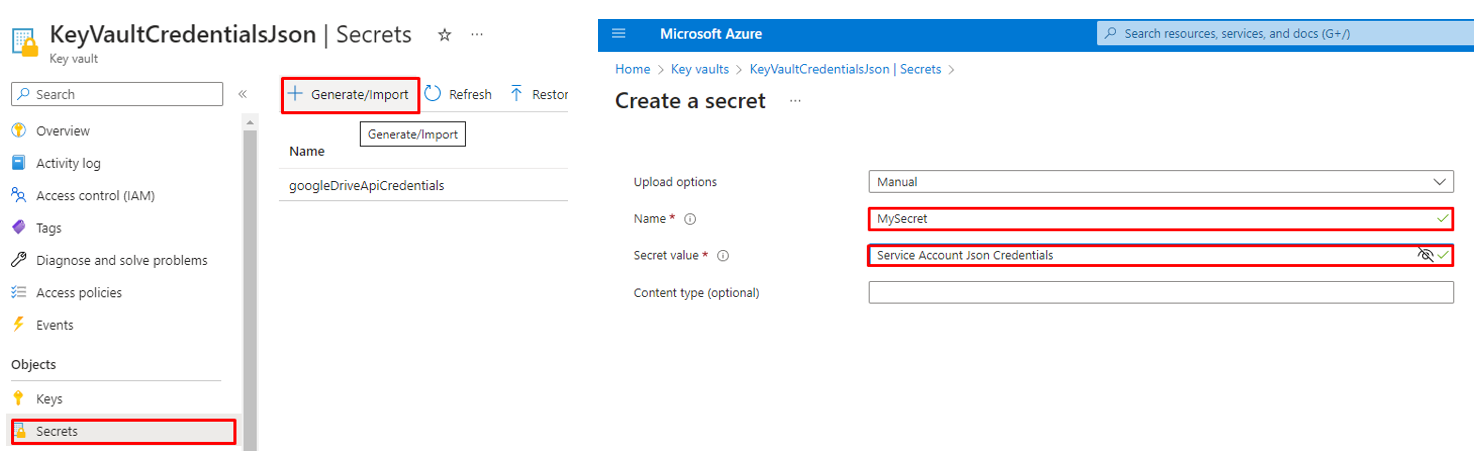
Next, click on Secrets, then click on Generate/import, and create the secret with the credentials you received from the Service Account in JSON format.
- But there is a trick here. The JSON credentials came as a JSON-indented structure like this JSON (note that the information inside are faked):
{

   “jsonCredentials”: “serviceAccount”,

   “Token”: “kjflasdjsaçlkçdklsakkpogakopda”,

   “user”: “lr”

}
-
You should pass it like this, as a single line.
{ "jsonCredentials": "serviceAccount", "Token": "kjflasdjsaçlkçdklsakkpogakopda", "user": "lr" }
-
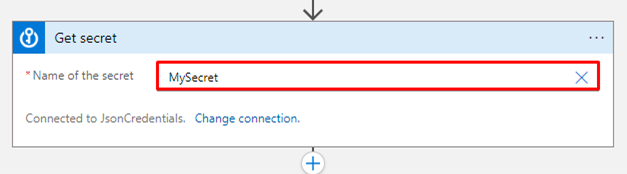
Save the secret and going back to the Logic App, add an Action Get Secret from the Key Vault
- After this, add a For each, with the Body as the output from the previous step.

-
Next, add an HTTP action. In this call, you are going to call your Azure Function, and to do that, you need to get the correct URL from it.
-
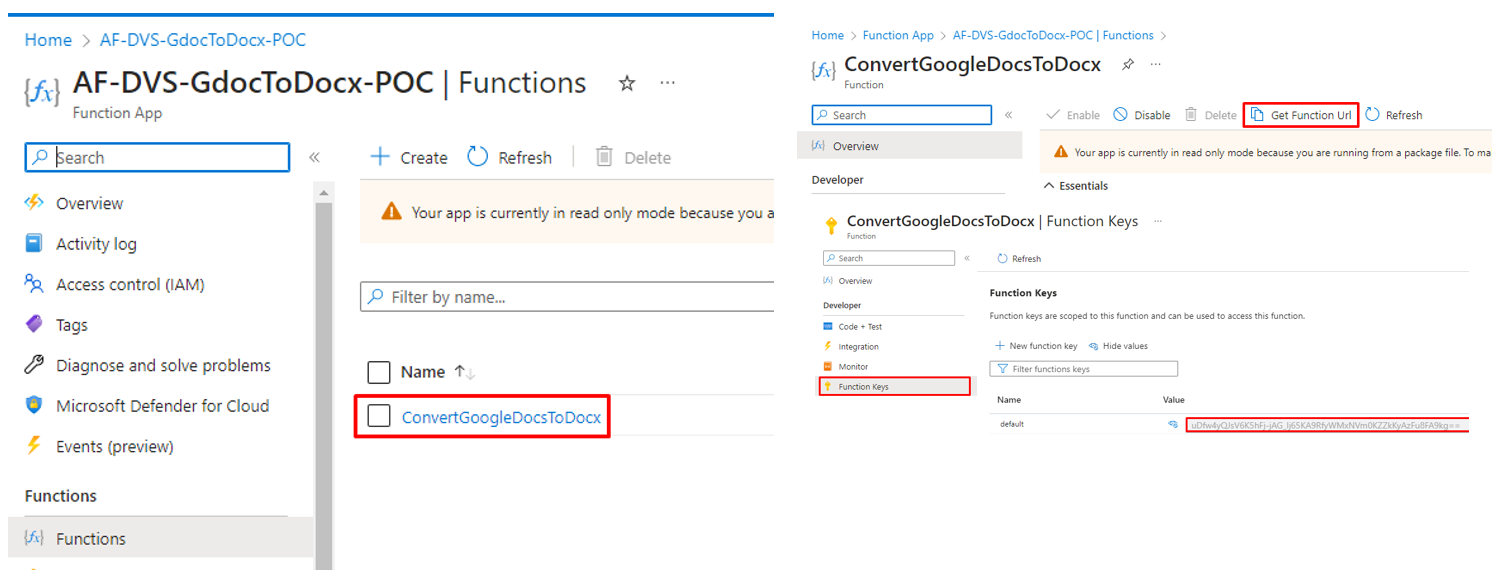
To do that in the Azure Portal, search for Function App, click on it, and click in the Function App you just created, next click on Functions, click on the Function you created and next click on Get Function Url, and copy it somewhere, next click on Function Keys, and copy the Function Key you have there.
-
- Now going back to the Logic App, as we said earlier, create an HTTP action and use the Method POST, as the URI use the one you just copied from the Azure Function
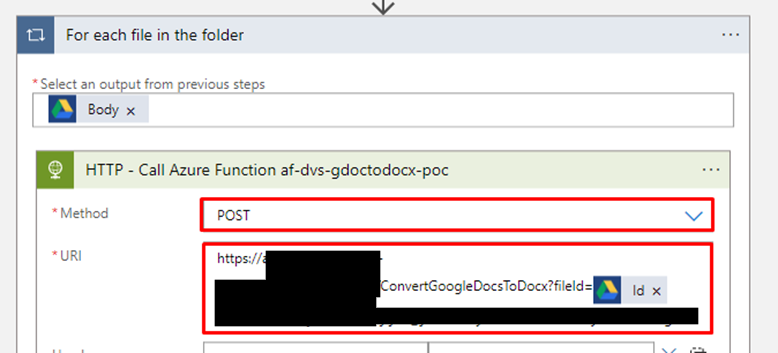
- As you can see in the picture above, and as we explained before, you need to pass a fileID to the Azure Function, so you can do it using the dynamic content from list files and choose Id, and the way it should go with the URL is also a query:
- fileId=Id(dynamic content)
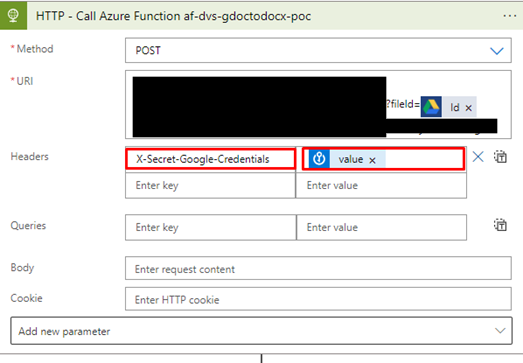
- Next, the rest of the HTTP should be configured with the Headers:
- Key: X-Secret-Google-Credentials || value: The secret value (dynamically selected from Get Secret action)
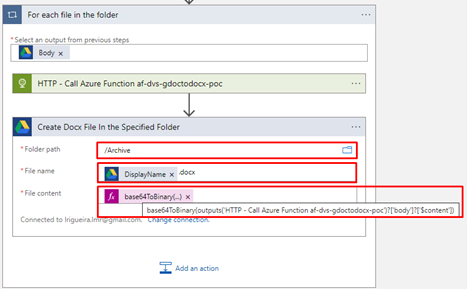
- Next, add another Action from Google Drive or any other place FTP, OneDrive, and so on. This time a Create File.
- Choose the Folder path you want to create the new file. As the file name dynamically choose the DisplayName and add a .docx to the end of it, as the file content using the expression:
-
base64ToBinary(outputs(‘HTTP – Call Azure Function af-dvs-gdoctodocx-poc’)?[‘body’]?[‘$content’])
-
- Choose the Folder path you want to create the new file. As the file name dynamically choose the DisplayName and add a .docx to the end of it, as the file content using the expression:
And why the above expression? Because if we saw a run from this Logic App, what we get as a response from the HTTP is this structure:
{

"statusCode": 200,

"headers": {

"Date": "Mon, 19 Jun 2023 07:43:49 GMT",

"Content-Length": "30624",

"Content-Type": "application/vnd.openxmlformats-officedocument.wordprocessingml.document",

"Content-Disposition": "attachment; filename=converted.docx"

},

"body": {

"$content-type": "application/vnd.openxmlformats-officedocument.wordprocessingml.document",

"$content": "UEsDBBQACAgIAHgF01YAAAAAAAAAAAAAAAASAAAAd29yZC9udW1iZXJpbmcueG1spZNNTsMwEIVPwB0i…

}

}
So, the expression we use is to decode the base64 to binary to create the file correctly.
And this is it! Your files are now converted into .docx.
This is how your Logic App should look like:
There is only one limitation. For this solution to work correctly, the file(s) inside your Drive should not be private.
You will probably be asking why didn’t we use a Google Drive Action Get File Content and then create a file with the .docx extension?
First of all, that will not work, maybe because lack of support from Google, but every time we try to get a file content via the action Get File Content by path/ Get File Content by id, we get this error:
{

"status": 409,

"message": "The specified file is of type 'application/vnd.google-apps.document' and does not have any downloadable content.\r\nclientRequestId: 4358c753-afe9-45ec-b26d-ba5912f45c7d",

"error": {

"message": "The specified file is of type 'application/vnd.google-apps.document' and does not have any downloadable content."

},

"source": "googledrive-we.azconn-we-005.p.azurewebsites.net"

}
The goal of this new series is to find common problems that people are facing with Logic Apps, either on StackOverflow, Logic App forums, Azure Logic Apps Microsoft Q&A, or any other source – fill free to provide ideas/problems you would like to be addressed – and provide a solution or solutions to that problem. At least I will add my point of view to address that issues. Of course, there may be other solutions; feel free to comment if that’s the case.
I hope you find this content useful, and stay tuned for more Decoding Logic App Dilemmas.
Credits: Huge thanks to my team member Luís Rigueira! If I was the architect of this solution, he was the developer.