Azure Logic App
Logic App is a Workflow Orchestration Engine running in the cloud. It provides a way to simplify and implement scalable integrations and workflows in the cloud – with a visual designer to model and automate the business process as a series of steps known as the workflow.
Connectors
Azure Logic App provides an easy way to connect with external services like Dropbox, Office365, Github, SalesForce, MailChimp etc., called Connectors where each connector has its own set of configuration. Connectors allow a quick integration across services and protocols.
Visual tools always give you a great experience for performing a certain task, but when you need to perform the same task in a repetition – it becomes a frustration and that’s where you need some code to help you save your time. In this post, I’m explaining how to create Logic Apps using Logic Apps .NET SDK.
.NET SDK for Logic Apps is around since late 2015 and is evolving progressively since then, but not matured yet as few of its dependencies are still in the preview version.
There’s another way to create Logic Apps – Using the Azure Resource Management SDK, but that comes with a different handling mechanism and practically it takes pretty long time to deploy (usually from minutes to hours depending on the type and number of resources specified in the template). On the other side Logic Apps SDK does the same job in seconds, of course for managing Logic Apps only. 🙂
A Logic App has a series of steps to perform and hence called a Workflow. The SDK requires a Workflow Definition in JSON format in order to create a new Logic App or to modify an existing one.
What’s required for this demo exercise?
- Azure Tenant ID
- A Resource Group inside the Azure Subscription
- A Service Principal Account – for authentication/authorization
- Client ID
- Client Secret
- Azure Logic Apps SDK
Here I assume that you have an Azure subscription already. If not – please create one here: Create your free Azure account today
If you intend to create Logic Apps in Large number I would suggest to keep them in a separate Resource Group – just for the separation. Though there’s no such restriction and you can always use any existing Resource Group.
Getting Service Principal Account Credentials
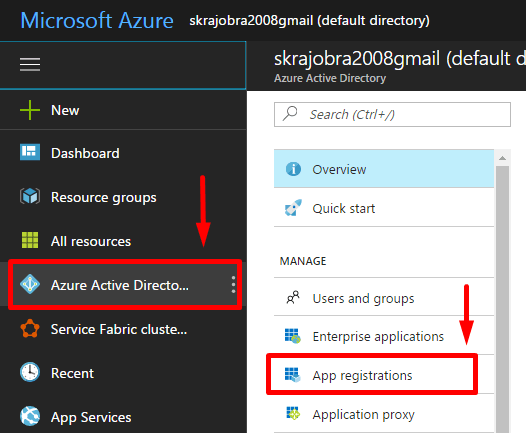
1: Click on “Azure Active Directory” -> “App Registrations”
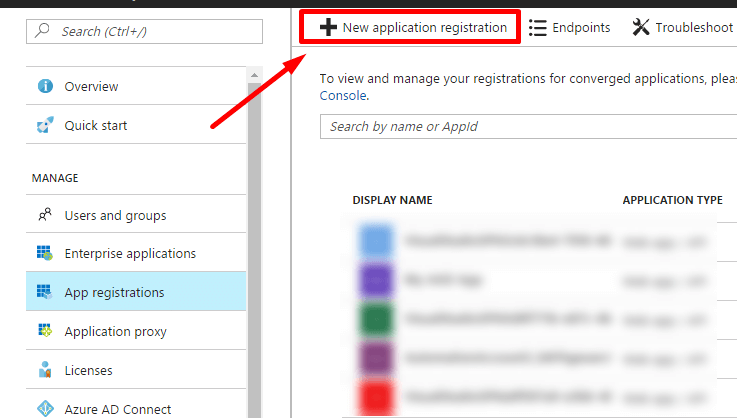
2: Click on “New Application Registration”
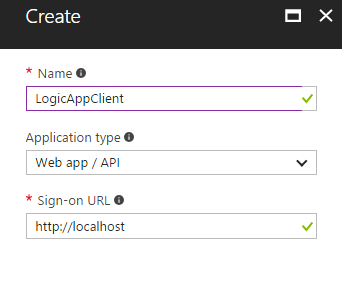
3: Fill out the details. Select Web app/API in Application Type. I’m putting just a random URL in sign-on URL field as I don’t intend to use it for Web Authorization.
4: Click on new created 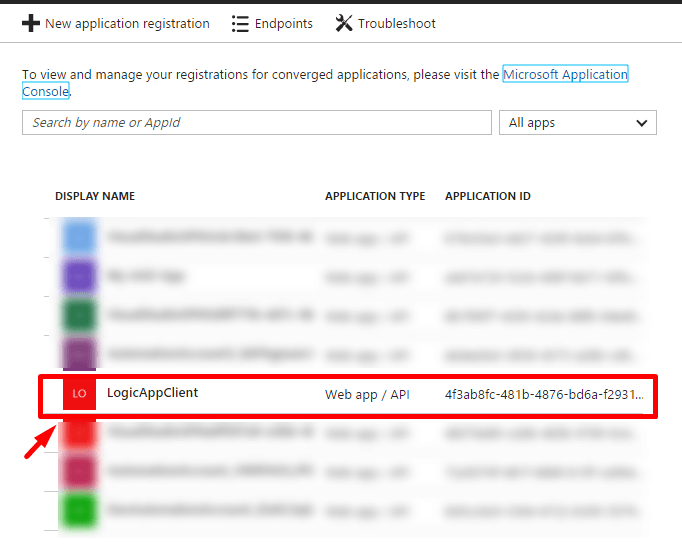
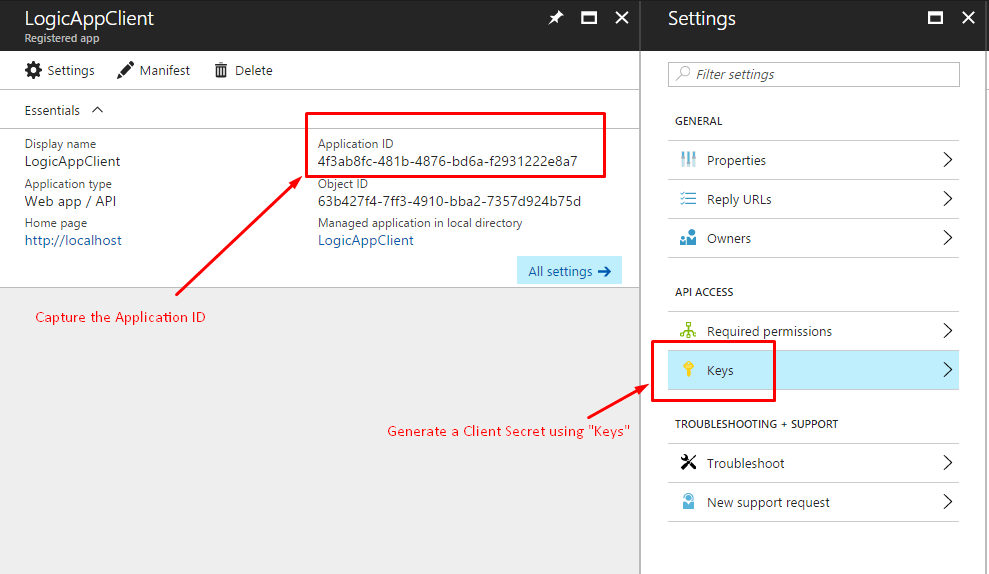
5: Collect Application ID. This is the Client ID we will use further. Click on “Keys” under Settings blade and generate a Client Secret.
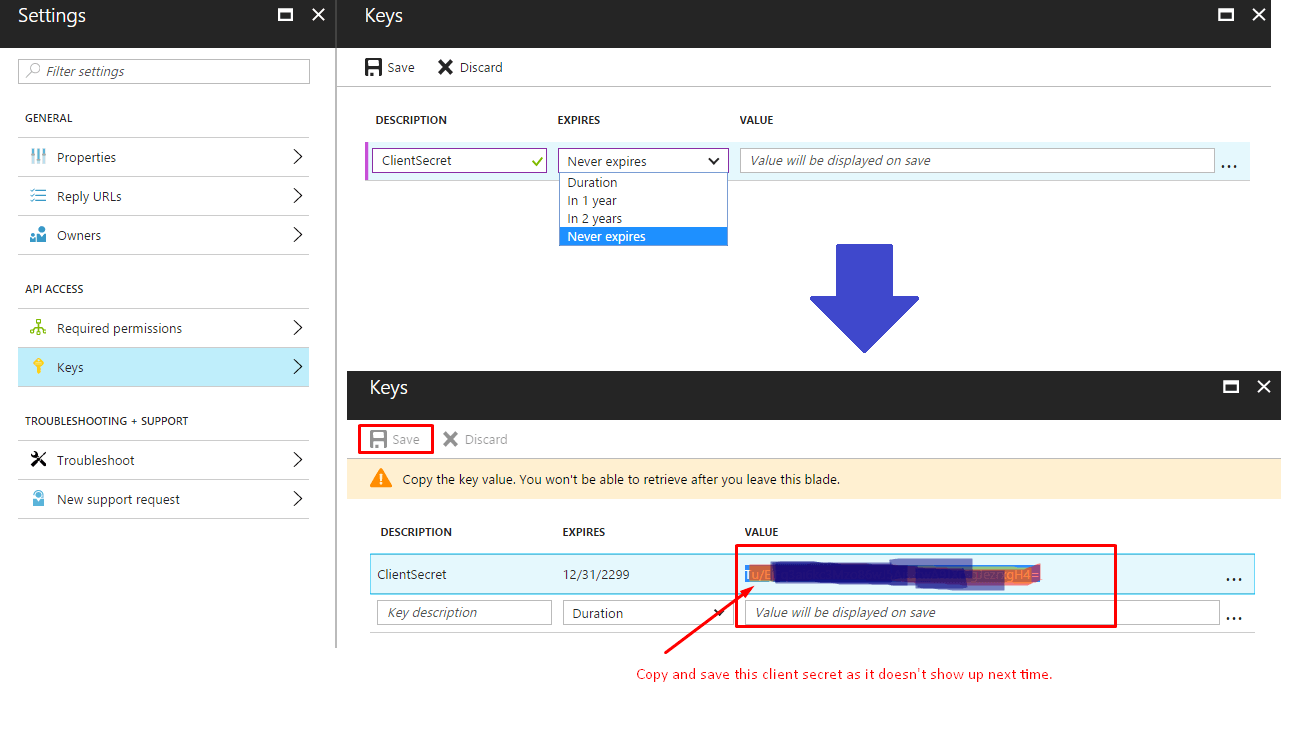
6: Put a description and select the Expiration period. Hit save button on top left and collect the generated a Client Secret.
We have the Service Principal Account ID/Secret and, now we need to authorize the Client ID to manage resources of the given Resource Group.
| Note: The commands provided below are Powershell commands, and they require you to login into your Azure account first.
Login into your Azure subscription [powershell]"Login-AzureRmAccount" [/powershell] provide your login credentials. Get Azure subscriptions [powershell]"Get-AzureRmSubscription"[/powershell] Set the subscription context under which you want to run the commands [powershell]"Set-AzureRmContext -SubscriptionId <your subscription id>"[/powershell] That’s it! |
How to Authorize a Service Principal account for accessing a certain resource(s)
New-AzureRmRoleAssignment -RoleDefinitionName Contributor -ServicePrincipalName <ClientID> -ResourceGroupName <TargetResourceGroup>
You must first register a Resource Provider to start making use of it. When you create resources through the Azure Portal it registers them by default. If you’re creating any resource programmatically for the first time – then you must register the Resource Provider First. For example – if you want to create a Service Bus namespace programmatically you first need to Register “Microsoft.ServiceBus” ProviderNamespace. It throws an error otherwise saying the resource provider is not registered.
Run the following command in Powershell to register the Resource Provider for Logic Apps:
Register-AzureRmResourceProvider -ProviderNamespace Microsoft.Logic
Run the following command to see the list of Resource Providers currently available in Azure:
[powershell]Get-AzureRmResourceProvider -ListAvailable | Select ProviderNamespace[/powershell] Get all the registered Resource Providers: [powershell]Get-AzureRmResourceProvider | Select ProviderNamespace[/powershell] |
Let’s move on to the final step.
How to create Logic Apps using .NET SDK
Step 1: Fire up the Visual Studio and create a new windows console project
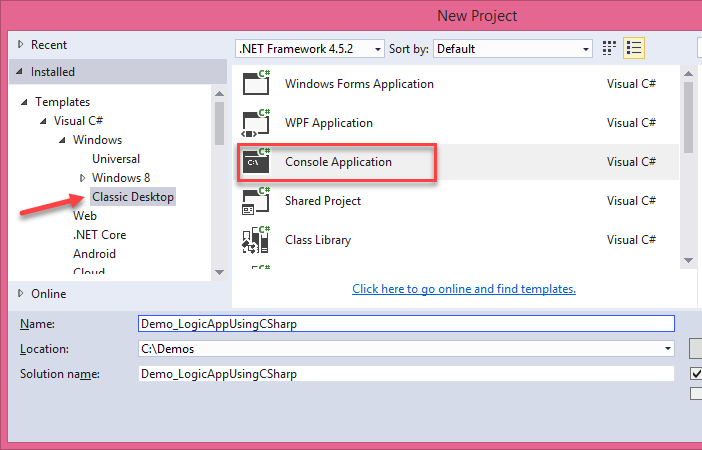
Step 2: Start Package Manager Console and Add Azure Logic Apps SDK to the project using Nuget:
Install-Package Microsoft.Azure.Management.Logic

You need a few other packages for performing the authentication/authorization with ClientID/Secret. Install the following packages using Nuget Package Manager:
install-package Microsoft.IdentityModel.Clients.ActiveDirectory -version 2.18.206251556
Next, install-package Microsoft.Rest.ClientRuntime.Azure.Authentication -version 2.2.2-preview
install-package Microsoft.Azure.Common.Authentication -version 1.7.0-preview
Basic workflow definition structure
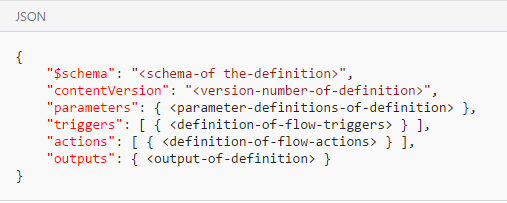
Please refer to the Workflow Definition Language schema for Azure Logic Apps for more details on creating the Workflow Definition – JSON.
The simplest Logic App I can think of is hitting a URL on recurring every hour for checking the health status:
var workflowDefinition = @"{
                    '$schema':'http://schema.management.azure.com/providers/Microsoft.Logic/schemas/2016-06-01/workflowdefinition.json#',
                    'contentVersion':'1.0.0.0',
                    'triggers': {
                        'Recurrence': {
                            'recurrence': {
                                'frequency': 'Hour',
                                'interval': 1
                            },
                            'type': 'Recurrence'
                        }
                    },
                    'actions': {
                        'ping_microsoft_site': {
                          'type': 'Http',
                           'inputs':{
                                'method':'GET',
                                'userAgent':'LogicApp',
                                'uri':'https://www.microsoft.com/en-in/'
                             }
                        }
                    }
                }";
In the JSON above (Workflow Definition) – it specifies an Http Trigger which makes a request to the home page of Microsoft every hour. Build a workflow definition with the flow of your choice and supply the workflow definition to LogicManagementClient. The above workflow definition creates the following LogicApp:
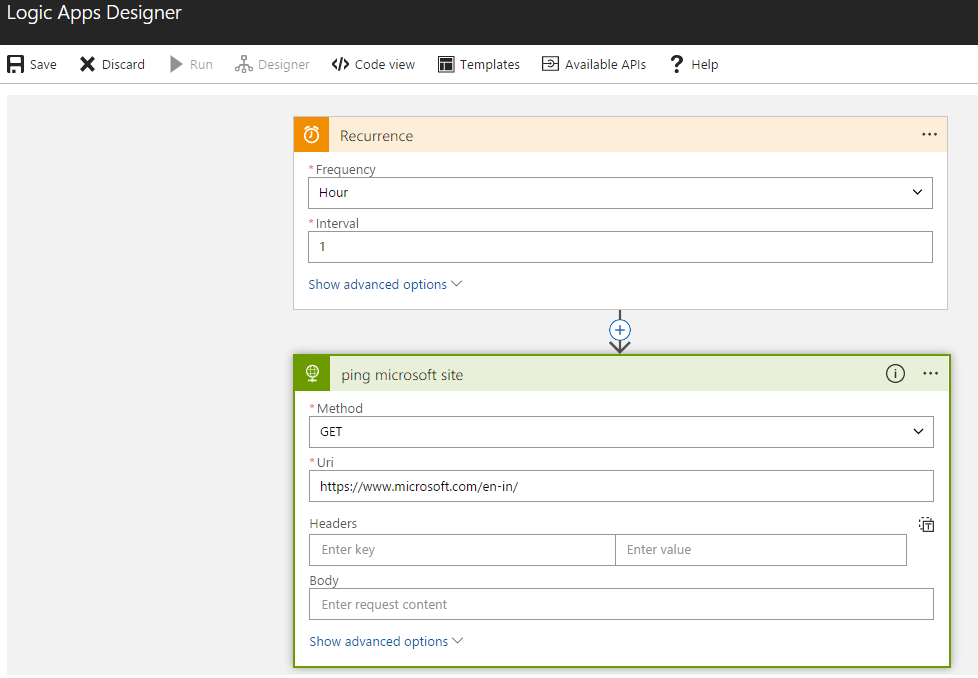
Creating, updating and deleting a Logic App is so easy with LogicManagementClient. Here’s the complete code (I’ve refactored the code a little for clarity):
using System;
using System.Threading.Tasks;
using Microsoft.Azure;
using Microsoft.Azure.Common.Authentication.Models;
using Microsoft.Azure.Management.Logic;
using Microsoft.Azure.Management.Logic.Models;
using Microsoft.IdentityModel.Clients.ActiveDirectory;
using Microsoft.Rest;
using Newtonsoft.Json.Linq;

namespace LogicApp_DemoApp
{
    internal class Program
    {
        private static void Main(string[] args)
        {
            var azureSubscriptionId = "******************************";

            var azureTenantId = "******************************";

            var azureClientId = "******************************";

            var azureClientSecret = "******************************";

            var logicAppResourceGroupName = "LogicApps"; // replace with the resource group of your choice

            var logicAppLocation = "CentralIndia"; // replace with the location of your choice

            var logicAppName = Guid.NewGuid().ToString();

            var logicAppsHelper = new LogicAppsHelper();

            var workflowDefinition = @"{
                    '$schema':'http://schema.management.azure.com/providers/Microsoft.Logic/schemas/2016-06-01/workflowdefinition.json#',
                    'contentVersion':'1.0.0.0',
                    'triggers': {
                        'Recurrence': {
                            'recurrence': {
                                'frequency': 'Hour',
                                'interval': 1
                            },
                            'type': 'Recurrence'
                        }
                    },
                    'actions': {
                        'ping_microsoft_site': {
                          'type': 'Http',
                           'inputs':{
                                'method':'GET',
                                'userAgent':'LogicApp',
                                'uri':'https://www.microsoft.com/en-in/'
                             }
                        }
                    }
                }";


            var result = logicAppsHelper
                .CreateOrUpdateLogicAppAsync(
                    azureSubscriptionId,
                    azureTenantId,
                    azureClientId,
                    azureClientSecret,
                    logicAppResourceGroupName,
                    logicAppLocation,
                    logicAppName,
                    workflowDefinition)
                .GetAwaiter()
                .GetResult();
        }
    }

    public class LogicAppsHelper
    {
        public async Task<bool>
            CreateOrUpdateLogicAppAsync(
            string azureSubscriptionId,
            string tenantId,
            string azureClientId,
            string azureClientSecret,
            string logicAppResourceGroupName,
            string logicAppLocation,
            string logicAppId,
            string workflowDefinition
        )
        {
            var success = false;

            var logicManagementClient = await
                GetLogicManagementClient(azureSubscriptionId, tenantId, azureClientId, azureClientSecret);


            var workflow = new Workflow
            {
                State = WorkflowState.Enabled,
                Location = logicAppLocation,
                Definition = JToken.Parse(workflowDefinition)
            };

            workflow.Definition = JToken.Parse(workflowDefinition);
            var resultWorkflow = await
                logicManagementClient.Workflows.CreateOrUpdateAsync(logicAppResourceGroupName, logicAppId,
                    workflow);

            if (resultWorkflow.Name == logicAppId)
                success = true;

            return success;
        }

        public async Task<bool>
               DeleteLogicAppAsync(
                    string azureSubscriptionId,
                    string tenantId,
                    string azureClientId,
                    string azureClientSecret,
                    string logicAppResourceGroupName,
                    string logicAppId)
             {
                 var logicManagementClient = await
                             GetLogicManagementClient(azureSubscriptionId, tenantId, azureClientId, azureClientSecret);

                 await logicManagementClient.Workflows.DeleteAsync(logicAppResourceGroupName, logicAppId);
                 return true;
            }


        private static async Task<AuthenticationResult> GetAuthenticationResult(AuthenticationContext authContext,
            string resource, ClientCredential credentials)
        {
            return await authContext.AcquireTokenAsync(resource, credentials);
        }

        private static async Task<LogicManagementClient> GetLogicManagementClient(string azureSubscriptionId,
            string tenantId, string azureClientId, string azureClientSecret)
        {
            var environment = AzureEnvironment.PublicEnvironments[EnvironmentName.AzureCloud];

            var authority = string.Format("{0}{1}", environment.Endpoints[AzureEnvironment.Endpoint.ActiveDirectory],
                tenantId);

            var authContext = new AuthenticationContext(authority);

            var credential = new ClientCredential(azureClientId, azureClientSecret);

            var authResult = await GetAuthenticationResult(authContext,
                environment.Endpoints[AzureEnvironment.Endpoint.ActiveDirectoryServiceEndpointResourceId], credential);

            var tokenCloudCredentials = new TokenCloudCredentials(azureSubscriptionId, authResult.AccessToken);

            var tokenCreds = new TokenCredentials(tokenCloudCredentials.Token);

            return new LogicManagementClient(tokenCreds) {SubscriptionId = azureSubscriptionId};
        }
    }
}
Please find the working demo application attached with this post. Note that you have to replace the asterisks(*) with your Azure credentials before you run the demo app.
Thanks for reading, please share your valuable comments or feedback in the box below. Happy Learning!

